Showing posts with label Hacked / Patches. Show all posts
Sunday, October 2, 2011
Tuesday, September 27, 2011
New Symbian Hack S60v3/S60v5/S^3 With Norton Security By Coderus (very simple)
New Symbian Hack With Norton Security By Coderus (very simple).
Norton Symbian Hack by Coderus
Symbian Hacked...again! Norton Security
No Need to Cert and Key!!!
You can't beleve this!
Symbian hack by Norton Security By
CODeRUS.
How to hack?
1. install NortonSymbianHack.sisx
2. Launch
3. Go Options- Anti-Virus - Quarantine list
4. Go Options - Restore, accept prompt
5. Exit application, delete from App
manager ( Symantec Symbian Hack ). Also delete c:\shared\ folder.
6. Install RomPatcherPlus_3.1.sisx
7. Launch and apply patches:
- Open4all for full access to file system
- Installserver for installing any unsigned applications
(if red cross - instal- instalserver.exe.Pack)
Set patches to auto if needed (Options - Add to auto).
Hacked successfuly.
NortonSymbianHack.sisx:
RomPatcherPlus_3.1.zip:
installservers_pack.zip:
One step Hacking tool for Symbian S60 3rd, 3rd FP1, 3rd FP2, 5th, Symbian^3 and Symbian Anna smartphones.
Break the protection of all mobiles without Software supports the third and fifth generation, and Symbian^ 3
After a long wait and a lot of effort to break the protection on the mobile phone easily and without mistakes.
Today's theme is to the easiest way to break your protect phone and supports all the mobiles and even c7 and c6 n8
Program for the third and fifth generation and the system developer S^ 3
let getting into the topic and explain the program
1.first of all you must get your mobile certificate from certificate requests site here
2.Download the program CertUpdater and install it on your phone without a certificate.
3.Download the program CertHack_Installer and sign it with your special certificate for your mobile and then install it.
4.Jump to the program Hackit and wait a little if asked anything from you press OK, and now your mobile is broken protect.
Hack Nokia with Dr.Web Methods For S60v3/S60v5/Symbian^ 3 Anna by CODErUS (Without CER & Key).
Dr. hack method using the application. This Web does not require cer & key in the process hacking.
Thanks 4 The Legend CODErUS .
How to use Dr. Hack. web:
1. Extract / unzip the Private folder in the file to your memory card Quarantine.zip to cell phones. We must use the computer / PC (with Card Reader) or it could be with other phones that have been Hacked ( move MMC you to the phone that has terhack to Private folder and then extract using the x-plore).
1.Extract the Private folder to E: / .
2. Replace the MMC into your phone and turn on the phone.
3. Install X-plore application, Dr. Web 6:00, and Rom Patcher 3.1 Lite to the MMC (Important!! Have to go to memory card)
4. Open the application Dr. Web, then click the "Cancle" if it looks notification request licenses
(see picture)
5. Still in the application of Dr.. Web, select Options> Quarantine> Options> Select All> Options> Restore.
(see picture)
6. Open X-plore and extract the Patches folder that is in Patches & Installserver.zip file to drive E: /
(here)
7. Open ROMPatcher + 3.1 application, then apply and add to the auto patch and installserver open4all.
8. See if all patches marked with a green checklist. If the patch installserver red crossed-installserver.exe then extract the file (according to the type of phone) that exist in installserver folder to C: / sys / bin /
(here)
9. If all patches have been green or we have to extract installserver.exe, now we download ROMPatcher Unsigned + 3.1
(COMPLETE)
then installed in the MMC.
Now your phone has been too "hack", now you can install all unsigned applications and can edit the folder system.
Download all these files:
1. X-plore Signed 1:53
2. Dr. Signed Web 6:00
3. Rom Patcher + 3.1 Lite.
4. Quarantine.
5. Patches & Installserver.
1. X-plore Signed 1:53
2. Dr. Signed Web 6:00
3. Rom Patcher + 3.1 Lite.
4. Quarantine.
5. Patches & Installserver.
Download ROMPatcher Unsigned + 3.1
Sunday, September 25, 2011
New Symbian Hack without PC! For Vivaz too! by CODERuS.
1. install UMU*Hack.sisx. After installing application will be launched.
2. Accept connection ask (you can use WiFi)
3. Accept trial key
4. Accept license
5. Select Yes
6. Select No, then OK
7. Select Ok - Enter 123 - Retype 123
8. Press Options - Anti-Virus
9. Go to Quarantine
10. Options - Restore - Press Yes
11. Back - Home - Exit - Uninstall UMU Mobile Security
12. Enter 123 password for uninstallation
13. Install RomPatcherPlus_3.1.sisx - Launch it - Apply Open4all - You get full access to all folders
14. Apply installserver (if red cross - found in web installserver for your phone) - You can install any applications without signing.
Enjoy !!!
All Credits Goes to CODERuS.
Nokia Download:
SonyEriccson download:
Roompacherplus download:
instalserver Pack download:
Friday, July 8, 2011
Helloox2 v2.11 S60v3 S60v5 S^3 Symbian Signed.
What is HelloOX2?
HelloOX2 is a One step Hacking tool for Symbian S60 3rd, 3rd FP1, 3rd FP2, 5th smartphones. Hacking mean that getting full access to the phone's system files, with that capability, we can install a root certificate, and with the root certificate, we can install anything we want to mod the phone, include the Manufacturer capabilities requested apps. Completely fix annoying certificate error!
How to use it?
Hacking:
Install then run it. All steps will run automatic, your phone will be Hacked in a minute.
UnHacking:
Run HelloOX2 again after Hacking, it'll prompt a menu let you choose UnHack or Hack again.
What HelloOX2 does?
1. Map drive
2. Unpack Hacking files to the virtual drive
3. Activate file system
4. Unmap drive
5. Install root certificate
6. Install RomPatcher+ (by Il.Socio)
7. Done!
Tuesday, June 14, 2011
HelloOX2 v2.11 Unsigned.sis & Signer (PC) - S60v3 S60v5 S^3 Symbian Anna.
HelloOX2 v2.11 released! RP+ 3.0 for S^3, Symbian Anna included
What is HelloOX2? HelloOX2 is a One step Hacking tool for Symbian S60 3rd, 3rd FP1, 3rd FP2, 5th, Symbian^3 and Symbian Anna smartphones.
Hacking mean that getting full access to the phone's system files, with that capability, we can install a root certificate, and with the root certificate, we can install anything we want to mod the phone, include the Manufacturer capabilities requested apps. Completely fix annoying certificate error!
for example:
ROMPatcher+ is a Manufacturer capabilities requested app, using it to patch the installserver you'll be able to install any apps (include unsigned) without certificate error anymore.
HelloOX2 is here for everything you need. Hacking in only One step, just run it, it does all the rest for you. It has been tested and confirmed working on almost all Symbian S60 3rd (FP1, FP2), 5th, Symbian^3 and Symbian Anna devices, include the latest phone models Nokia E6-00, X7-00, N8-00, E7-00, C7-00, C7 Astound, C6-01, C5-03, E5-00...etc.
HelloOX2 v2.11 Unsigned version must sign with a 17 capabilities developer certificate before installation. So you must request your cer & key to shoujizu.net first.
What is HelloOX2? HelloOX2 is a One step Hacking tool for Symbian S60 3rd, 3rd FP1, 3rd FP2, 5th, Symbian^3 and Symbian Anna smartphones.
Hacking mean that getting full access to the phone's system files, with that capability, we can install a root certificate, and with the root certificate, we can install anything we want to mod the phone, include the Manufacturer capabilities requested apps. Completely fix annoying certificate error!
for example:
ROMPatcher+ is a Manufacturer capabilities requested app, using it to patch the installserver you'll be able to install any apps (include unsigned) without certificate error anymore.
HelloOX2 is here for everything you need. Hacking in only One step, just run it, it does all the rest for you. It has been tested and confirmed working on almost all Symbian S60 3rd (FP1, FP2), 5th, Symbian^3 and Symbian Anna devices, include the latest phone models Nokia E6-00, X7-00, N8-00, E7-00, C7-00, C7 Astound, C6-01, C5-03, E5-00...etc.
HelloOX2 v2.11 Unsigned version must sign with a 17 capabilities developer certificate before installation. So you must request your cer & key to shoujizu.net first.
How to use it?
Install helloOX2signer.exe to U'r PC. Put Cer & Key and make helloOX2_signed.sisx.
Put helloOX2_signed.sisx to U'r phone, Install then run it. All steps will run automatic, your phone will be Hacked in a minute.
Install helloOX2signer.exe to U'r PC. Put Cer & Key and make helloOX2_signed.sisx.
Put helloOX2_signed.sisx to U'r phone, Install then run it. All steps will run automatic, your phone will be Hacked in a minute.
HelloOX2 v2.11 Signer (PC).zip:
HelloOX2 v2.11 S60v3 S60v5 S^3 Symbian Anna Unsigned.sis :
Sunday, June 12, 2011
RomPatcher Plus 3.0 S60v3 S60v5 S^3 Unsigned.
RomPatcher+ 3.0 is an improved and fixed version of the RomPatcher software developed by ZoRn. Using RomPatcher+ it is possibile to reach a new level of customization for you Symbian phone.
Changelog:
1. New: RomPatcher+ 3.0 now supports also Symbian^3 devices! All the 3rd/5th/S^3 devices are fully supported
2. Improved: InstallServer.rmp patch has been updated to support S^3 devices too. The old Open4All.rmp patch is already working on S^3 too, without any change.
3. Improved: removed the "Donate with SMS" option, it was used by too few people.
4. Fixed: sometimes the "RP+ Recovery Fault" message was wrongly shown, it should be definitely fixed.
Tuesday, June 7, 2011
SpeedUp OS 9.2 & OS 9.3.
Hi, actually I found this small utility from other forum and get it very useful for any SymbianOS phone user.
The file is suitable to install on S60 v9.2 and v9.3, in which there is no graphic hardware accelerator built-in. This file actually accelerates the components of the graphics (videos, games, etc.), as well as the cache memory (up to 4 MB) for faster start up and application performance.
Package speed.sis accelerates smartphone, on the other hand the package standart.sis returns it to the default setting.
CAUTION After installation, you must to restart your Smartphone.
For some user with graphic hardware accelerator may give it a try to test whether it improves your application loading time or not ??
Sorry guys, there is no screen for me to capture and it doesn't has any shortcut as well.
Note: For those who install the app and getting the "certificate error", please sign the app and install it.
for some additional info for this
it is actually a .txt inside the sis package, to be saved in private\10202be9 folder
just copy .txt to C:\private\10202be9\
and restart to take effect..
Note: I have tested this in my N79
Yes, i noticed faster boot-up, gallery browsing and all-in-all mobile handling apps..
The file is suitable to install on S60 v9.2 and v9.3, in which there is no graphic hardware accelerator built-in. This file actually accelerates the components of the graphics (videos, games, etc.), as well as the cache memory (up to 4 MB) for faster start up and application performance.
Package speed.sis accelerates smartphone, on the other hand the package standart.sis returns it to the default setting.
CAUTION After installation, you must to restart your Smartphone.
For some user with graphic hardware accelerator may give it a try to test whether it improves your application loading time or not ??
Sorry guys, there is no screen for me to capture and it doesn't has any shortcut as well.
Note: For those who install the app and getting the "certificate error", please sign the app and install it.
for some additional info for this
it is actually a .txt inside the sis package, to be saved in private\10202be9 folder
just copy .txt to C:\private\10202be9\
and restart to take effect..
Note: I have tested this in my N79
Yes, i noticed faster boot-up, gallery browsing and all-in-all mobile handling apps..
Thursday, June 2, 2011
HelloOX2 v2.10 S60v3 s60v5 S ^ 3 Unsigned (How To Easily Hack Symbian).
What is HelloOX2?
HelloOX2 is a One step Hacking tool
for Symbian S60 3rd(FP1, FP2), 5th
and Symbian^3 phone. Hacking
mean that getting full access to the
phone's system files, with that
capability, we can install a root certificate, and with the root
certificate, we can install anything
we want to mod the phone, include
the Manufacturer capabilities
requested apps. Completely fix
annoying certificate error!
Changelogs v2.10 update :
- new Hacking method for all Nokia
phone models, 3rd, 5th and S^3 all
supported(Thanks stas686)
- old Hacking method still keep for
non-Nokia phone models, SAMSUNG,
SonyEricsson...etc
- included ROMPatcher+ updated to
v2.6 (by Il.Socio)
- 5th modded installserver included
- better UnHacking
How to use it?
Hacking: Signed using your cer and
key. Install then run it. All steps will
run automatic, your phone will be
Hacked in a minute.
UnHacking: Run HelloOX2 again
after Hacking, it'll prompt a menu let
you choose UnHack or Hack again. What HelloOX2 does? Nokia phone models:
1. Install CertProvisioner
2. Install root Certificate
3. Unpack modded Installserver *not
for 3rd FP2*
4. Install files Mover *UnHacking need that* & Move modded
Installserver *non-3rd FP2*
5. Install RomPatcher+ (by Il.Socio)
*not for Symbian^3*
6. Done! non-Nokia phone models:
1. Map drive
2. Unpack Hacking files to the
virtual drive
3. Activate file system
4. Unmap drive 5. Install root certificate
6. Install RomPatcher+ (by Il.Socio)
7. Done!
Supported Handset: Nokia 5800, Nokia 5230, Nokia
5233, Nokia 5250, Nokia 5228,
Nokia 5235, Nokia 3250, Nokia
5320, Nokia 5500, Nokia 5530,
Nokia 5630, Nokia 5700, Nokia
5730, Nokia 6110, Nokia 6120, Nokia 6124, Nokia 6210, Nokia
6220, Nokia 6290, Nokia 6650,
Nokia 6710, Nokia 6720, Nokia
6730, Nokia 6760, Nokia 6788,
Nokia 6790, Nokia: E50, E51, E52,
E55, E60, E61, E62, E63, E65, E66, E70, E71, E72, E75, E90, N8,
N71, N73, N75, N76, N77, N78, N79,
N80, N81, N82, N85, N86, N91,
N92,N93, N95, N96, N97, N97
mini, X6, C7-00, E7-00, C5-03,
C6.
All credits goes to FCA00000, leftup, Zorn, DeltaFoX,
wadowice, SWmail, abgnokia,
Il.Socio, @ndy, GANG's brothers,
stas686, Thanks to all people who
made this possible! ....
HelloOX2 is a One step Hacking tool
for Symbian S60 3rd(FP1, FP2), 5th
and Symbian^3 phone. Hacking
mean that getting full access to the
phone's system files, with that
capability, we can install a root certificate, and with the root
certificate, we can install anything
we want to mod the phone, include
the Manufacturer capabilities
requested apps. Completely fix
annoying certificate error!
Changelogs v2.10 update :
- new Hacking method for all Nokia
phone models, 3rd, 5th and S^3 all
supported(Thanks stas686)
- old Hacking method still keep for
non-Nokia phone models, SAMSUNG,
SonyEricsson...etc
- included ROMPatcher+ updated to
v2.6 (by Il.Socio)
- 5th modded installserver included
- better UnHacking
How to use it?
Hacking: Signed using your cer and
key. Install then run it. All steps will
run automatic, your phone will be
Hacked in a minute.
UnHacking: Run HelloOX2 again
after Hacking, it'll prompt a menu let
you choose UnHack or Hack again. What HelloOX2 does? Nokia phone models:
1. Install CertProvisioner
2. Install root Certificate
3. Unpack modded Installserver *not
for 3rd FP2*
4. Install files Mover *UnHacking need that* & Move modded
Installserver *non-3rd FP2*
5. Install RomPatcher+ (by Il.Socio)
*not for Symbian^3*
6. Done! non-Nokia phone models:
1. Map drive
2. Unpack Hacking files to the
virtual drive
3. Activate file system
4. Unmap drive 5. Install root certificate
6. Install RomPatcher+ (by Il.Socio)
7. Done!
Supported Handset: Nokia 5800, Nokia 5230, Nokia
5233, Nokia 5250, Nokia 5228,
Nokia 5235, Nokia 3250, Nokia
5320, Nokia 5500, Nokia 5530,
Nokia 5630, Nokia 5700, Nokia
5730, Nokia 6110, Nokia 6120, Nokia 6124, Nokia 6210, Nokia
6220, Nokia 6290, Nokia 6650,
Nokia 6710, Nokia 6720, Nokia
6730, Nokia 6760, Nokia 6788,
Nokia 6790, Nokia: E50, E51, E52,
E55, E60, E61, E62, E63, E65, E66, E70, E71, E72, E75, E90, N8,
N71, N73, N75, N76, N77, N78, N79,
N80, N81, N82, N85, N86, N91,
N92,N93, N95, N96, N97, N97
mini, X6, C7-00, E7-00, C5-03,
C6.
All credits goes to FCA00000, leftup, Zorn, DeltaFoX,
wadowice, SWmail, abgnokia,
Il.Socio, @ndy, GANG's brothers,
stas686, Thanks to all people who
made this possible! ....
Wednesday, April 20, 2011
Root Certificate hack 9.x/9.4/^3
Root Certificate hack
Root Certificate hack 9.x/9.4/^3
made by Dimonvideo Team
1. Install CertUpdater.sisx
2. Sign CertHack.sis using your own Devcert
3. Install signed CertHack twice (!!!)
-. Phone now hacked!
Attach is the certificate signing Leftup basic applications that require all:
X-Plore Allfiles, RomPatcher+ 2.6, FileBrowser S^3
You can sign and install any package using Leftup certificate (see Leftup.zip folder)
With access to system folders are advised to instalserver your smartphone and copy it to the folder C: / sys / bin. After that, all applications will be placed without a signature.
Compatibility: 9.1, 9.2, 9.3, 9.4 and ^3
addition:
You are all set but access has not appeared?
- Reboot your smartphone and install CertHack again.
(Detail looks like this method:
Set CertUpdater.sisx
Sign and install CertHack.sis (no hacking)
Reboot your smartphone.
Re-install CertHack.sis
Set RomPatcher 2.6
Activate patch Open4all
Move the file installserver.exe in c: / sys / bin
After that access is all hidden folders and the signature is not needed).
Root Certificate hack 9.x/9.4/^3
Root Certificate hack
Root Certificate hack 9.x/9.4/^3
made by Dimonvideo Team
1. Install CertUpdater.sisx
2. Sign CertHack.sis using your own Devcert
3. Install signed CertHack twice (!!!)
-. Phone now hacked!
Attach is the certificate signing Leftup basic applications that require all:
X-Plore Allfiles, RomPatcher+ 2.6, FileBrowser S^3
You can sign and install any package using Leftup certificate (see Leftup.zip folder)
With access to system folders are advised to instalserver your smartphone and copy it to the folder C: / sys / bin. After that, all applications will be placed without a signature.
Compatibility: 9.1, 9.2, 9.3, 9.4 and ^3
addition:
You are all set but access has not appeared?
- Reboot your smartphone and install CertHack again.
(Detail looks like this method:
Set CertUpdater.sisx
Sign and install CertHack.sis (no hacking)
Reboot your smartphone.
Re-install CertHack.sis
Set RomPatcher 2.6
Activate patch Open4all
Move the file installserver.exe in c: / sys / bin
After that access is all hidden folders and the signature is not needed).
Root Certificate hack 9.x/9.4/^3
Root Certificate hack
Root Certificate hack 9.x/9.4/^3
made by Dimonvideo Team
1. Install CertUpdater.sisx
2. Sign CertHack.sis using your own Devcert
3. Install signed CertHack twice (!!!)
-. Phone now hacked!
Attach is the certificate signing Leftup basic applications that require all:
X-Plore Allfiles, RomPatcher+ 2.6, FileBrowser S^3
You can sign and install any package using Leftup certificate (see Leftup.zip folder)
With access to system folders are advised to instalserver your smartphone and copy it to the folder C: / sys / bin. After that, all applications will be placed without a signature.
Compatibility: 9.1, 9.2, 9.3, 9.4 and ^3
addition:
You are all set but access has not appeared?
- Reboot your smartphone and install CertHack again.
(Detail looks like this method:
Set CertUpdater.sisx
Sign and install CertHack.sis (no hacking)
Reboot your smartphone.
Re-install CertHack.sis
Set RomPatcher 2.6
Activate patch Open4all
Move the file installserver.exe in c: / sys / bin
After that access is all hidden folders and the signature is not needed).
Symbian^3 - Tips & Tricks
1. Add most used apps/contacts to the home screen. The N8 has three, fully customizable, active home screens. You can switch between them by swiping left or right, or by pressing the button with 3 dots, in the bottom-center of the screen.
There are two ways to change the content of your home screen: you can simply tap and hold the screen for a couple of seconds, OR you can press ‘Options’ and then ‘Edit Home screen‘, as shown below.
In both cases, you’ll be at the screen that is similar to the one below:
Now, you can add new shortcuts by pressing the ‘plus’ sign and selecting the desired widget/shortcut from the given list (officially called “Widget catalogue”).
2. Remove unwanted home screen shortcuts. When you turn on your N8 for the first time, you’ll see a few things on the home screens you may not like. The easiest way to remove them is to do a similar procedure as shown in the tip number 1. Once you get to the screen for editing home screens, just tap the undesired shortcut once, and you’ll see a “Remove” message that pops-up. Click on it, and the shortcut is gone!
3. Rearrange home screen shortcuts. If you’re a neat person, you’re going to want to tweak each home screen ’till it’s perfect! Rearranging the stuff that is on the home screen is super-easy – as you’ve seen above, click ‘Options’, then ‘Edit Home screen’, and then just drag-and-drop the shortcut you want to move to the desired position.
4. Change the home screen wallpaper. One of the great features of the new Symbian (other than 3 home screens) is the ability to have a different wallpaper on every home screen. Repeat the steps from the first tip (“Options -> Edit home screen”), and then click “Options -> Change wallpaper“. You will be given a choice: “Default” and “Image”. Select “Default” if you want to keep the picture that is set as wallpaper by the current theme of your phone, or “Image”, if you want to select your own. Select the image you like from your phone’s gallery, and you’ll see a new wallpaper picture. Note: this is even easier on the C7: click “Options -> Change wallpaper” (don’t ask me why it’s different).
The transition between screens won’t be slower because of this, so feel free to add different pictures to different home screens. It’s easier to tell them apart this way…
5. Add and change favorite applications on the home screen. Having most-frequently-used apps on the home screen is very useful, so enter the home screen editing mode, and add the “Shortcuts” widget from the Widget catalogue.
You will see the shortcuts bar, with 4 apps, on the screen. Tap on it, and click “Settings”, in order to choose which 4 apps will be here.
Once there, select the app you want for each field.
6. Add favorite contacts to the home screen. You can add your loved ones and colleagues to your home screen in a pictured, contacts bar. To do so, you need to repeat the steps from tip no.1, and click the ‘plus’ sign. You will see a widget catalogue, and you need to select a widget called “Favorites”.
When you do so, you should notice a new widget on the home screen. Click “Add” (in the widget), and select up to 20 contacts! You do that by marking the desired contacts and pressing “OK”. The widget displays 4 contacts at a time, so scroll left-right to see other people, or to add more people. Important note: if you add a second Contacts bar to some other home screen, and modify it, the Contacts bar on the first screen gets modified too, so you cannot add 60 favorite contacts.
7. Remove unwanted contacts from the home screen. If you add a contact by accident, or you’re just not fond of that person anymore, you can remove his/hers shortcut by pressing the “Remove” button, in the Contacts bar, followed by marking the person you want to expel from your Favorites. If you cannot see the “Remove” button, scroll left-right through the Contacts bar until you locate it.
8. Assign a local picture to a contact. Contacts bar looks much better if you add pictures to your favorite contacts. By doing so, you’ll also see a picture of a contact during a call, so this is another good reason to assign pics to several contacts. Assigning a picture that is located on your phone is a breeze – get to the contact card by pressing the icon of the desired contact in the Favorites widget, or locate the contact in your contact list. When you do so, simply click on the green statue icon, and you’ll see the “Add image” pop-up.
All you need to do now, is to select the pic you want from your local gallery.
9. Assign a Facebook/Twitter picture to a contact. In order to do this, you need to have a Facebook or Twitter account, and you need to log in to at least one of those services on your N8 (in the app called Social Networks, naturally). As in the previous step, open the contact card, and now click on the “Social Networks” button. You will be taken to the mentioned app, and asked to link the online contact with the “real” contact in your phone. If these names don’t match, you can easily search for the online name, and assign it to the contact in the phone. When you locate the contact you need, click “More”, and then “Use this picture in Contact card“.
Great little tool if you ask me.The only thing that I don’t like is that these images are downloaded in very low quality.
10. Add a mailbox to the home screen. This is one of the features I just adore – you can see multiple mailboxes at a glance! As usually, go to the home screen editing mode, click ‘+’ sign, and select “Mail” from the widget list.
Now, you can add the email account that you’ve already made (simply by clicking on it), or create a new one. If you choose the create a new mailbox, click “Create new mailbox”, and follow the creation process. More about creating a new mailbox later.
12. Make all widgets on a home screen offline. Some widgets require network connection in order to display news, updates, etc… This is very handy, but sometimes (when abroad, for example), you will need to put them offline. This is done very simply: press “Options -> Widgets to offline mode“, and they will remain offline until you click “Widgets to online mode”. This affects all 3 home screens!
13. Access various shortcuts from the home screen. Press the right-top corner of any home screen (near the battery life indicator), and you’ll see a useful pop-up window with several shortcuts.
Depending on your active connections, this window can be different, but there will always be 3 shortcuts: Connectivity, Clock and Battery. Additionally, you can access various options, as shown on the pic above. More on these options later, this is only a preview
14. Set up an alarm. It is very easy to set up an alarm from the home screen. Just tap the clock, and you’ll see the new screen with the “New alarm” button. Press it, and set the time you need to get up. (More on clock and alarms later.)
15. Switch to another profile. If you need to change the way your N8 reacts to incoming calls and messages, click on the “General” button on the Home screen (this button shows the name of the active profile, it will not always show General). When you do so, you’ll be able to select the profile you want from the scrollable list. Detailed tips about profiles later.
17. Delete a home screen. If you, for some reason, think that three home screens is too much, you can delete one (or two) in just a few clicks. On the unwanted screen, click “Options”, and then “Delete home screen“. Click “Yes”, and you’ll be down to two homescreens.
18. Add a new home screen. If you have less than 3 home screens, you can add new one (or two) by doing this: click “Options -> New Home screen“. The new screen is added to the right of the current home screen, so keep that in mind when adding a new screen.
OK, we’re covered the tips regarding the home screens, now to the Menu customization
19. Rearrange icons any way you like. In order to maximize your productivity, it’s good to put every icon in the place you like. All you need to do is: press “Options” and then “Organise“.
When you do so, you’ll see the menu in editing mode:
Now, just drag and drop any icon to the position you want. Once finished, press “Done”.
20. Move an icon to a different folder. I really think this is one of the most neglected functions of Symbian operating system (not just the new version). You can really put some order in your menu by moving and categorizing the icons. As in the previous tip, click “Options -> Organise”, and then tap and hold the icon you want to move. You’ll see a following pop-up:
Tap “Move to folder” , navigate to the destination folder, and click on it. Voila! The never-used icon is out of the way and buried deep in some folder. You can also drag and drop the icon the the desired folder. 21. Access various shortcuts from the menu. Similar to the tip no. 13, you can get to some useful places by a single press! If the phone is oriented horizontally, click on the middle-bottom part of the screen – it’s the position of the clock, in case you haven’t noticed.
As before, there are 3 permanent shortcuts: Connectivity, Clock and Battery, and some additional, depending on your active connections.
22. Change the menu layout. If you prefer a “list” menu layout over the “grid”, you can switch to it very fast. When in menu, press “Options” and then “List view“. You’ll see a list of your icons – not easy to navigate if you ask me. If you wish to switch back, do the same for the “Grid view”.
23. Minimize an open app. As you know, Symbian is the king of multitasking, so make sure you exploit this absolutely great option. All you need to do, in order to send any currently open app to the background, is to press the Menu key briefly. Now, you can open some other apps, get the data you need, and return to the minimized application. More in the following tip.
24. Show running applications. In order to return to the app you’ve just minimized, you can do one of the following things: (where ever you are in the menu or home screen), press “Options”, followed by “Show open applications“, or with more style, press and hold the menu key for approximately one second.
Either way, Task manager will pop up, and you will see a scrollable list of thumbnails of your running applications, as pictured below. Navigate to the app you want to bring to front (a.k.a. maximize), and click on it.
25. Quickly close an open app. I would recommend to close an app as soon as you’ve finished using it. This way, you’ll save the battery life and you’ll have more RAM memory to work with. Instead of bringing that application to the front (as described in the previous tip) and then clicking “Options -> Exit”, you can simply press the “Close” button (marked with an “X”) in the Task manager, as shown in the picture above.
26. Close multiple apps at once. If you have several apps running, and you don’t need them anymore, you can close them all with a single click. Just launch the Task manager by holding the Menu key, and then press and hold any displayed thumbnail. You’ll see a following screen:
Just tap “Close all“, and all running applications will be closed. Great time saver. I would like to have another option in this list: “Close all except this one“, so Nokia if you’re listening, please add this in future firmware update.
Now you know some practical stuff about the Symbian^3 menu and home screens. It is time to go through settings that will help you personalize and tweak the N8 the way you want.
27. Use Profiles. Your mobile phone comes with 6 fully modifiable profiles, and it is very wise to use them. Profile is a group of various settings, that include the ringtone selection, vibration options, etc.. Instead of turning the phone off during the meeting or while sleeping, you can simply put it in the corresponding profile. Open the Menu, go to “Settings” and open “Profiles“.
You will see a list of phone’s profiles. If you’re going to bed, select the “Silent” profile, and your phone will not make a sound! In the “Meeting” profile, your N8 will beep once when there’s an incoming call, etc… Profile named “Offline” is a bit different than the rest – you will not be able to use your phone for calls and texting. This profile is meant to be used in planes, and other places that forbid the use of GSM communication. To activate a profile, simply click on it, and select “Activate”.
28. Edit a profile. Symbian^3 profiles have a great level of customization. You can change almost anything you like, so let’s begin. Go to Profiles, as described in the previous tip, tap on the profile you want to modify, and then press “Personalise“. You will see a huge list of changeable fields. All fields are pretty much self-explanatory, so you shouldn’t have problems customizing.
29. Limit a profile’s duration. This is an extremely useful option. You can set the exact time you want the profile to expire. For example, I like to switch from “Silent” to “General” when I get up. This is done by opening profiles as we did in the tip 26, clicking on the desired profile, and then pressing “Timed“. You will see the following screen, so set the preferred time and click “OK”. Note: after timed profile expires, phone will return to the previously active profile.
30. Change a theme. As you already know, Symbian is absolutely great for customization, so you can change the entire look and feel of the phone. I like elegant, black themes with simple icons, as the one you see in the screenshots above. These themes are easy to use, and they also save battery life, when compared to white (bright) themes! Go to “Settings”, and then “Themes“, and you’ll be at the following screen.
Select “General“, and choose the theme you like. Here’s a different theme, for your reference. You can download more themes from OVI Store.
Just tap “Close all“, and all running applications will be closed. Great time saver. I would like to have another option in this list: “Close all except this one“, so Nokia if you’re listening, please add this in future firmware update.
Now you know some practical stuff about the Symbian^3 menu and home screens. It is time to go through settings that will help you personalize and tweak the N8 the way you want.
27. Use Profiles. Your mobile phone comes with 6 fully modifiable profiles, and it is very wise to use them. Profile is a group of various settings, that include the ringtone selection, vibration options, etc.. Instead of turning the phone off during the meeting or while sleeping, you can simply put it in the corresponding profile. Open the Menu, go to “Settings” and open “Profiles“.
You will see a list of phone’s profiles. If you’re going to bed, select the “Silent” profile, and your phone will not make a sound! In the “Meeting” profile, your N8 will beep once when there’s an incoming call, etc… Profile named “Offline” is a bit different than the rest – you will not be able to use your phone for calls and texting. This profile is meant to be used in planes, and other places that forbid the use of GSM communication. To activate a profile, simply click on it, and select “Activate”.
28. Edit a profile. Symbian^3 profiles have a great level of customization. You can change almost anything you like, so let’s begin. Go to Profiles, as described in the previous tip, tap on the profile you want to modify, and then press “Personalise“. You will see a huge list of changeable fields. All fields are pretty much self-explanatory, so you shouldn’t have problems customizing.
29. Limit a profile’s duration. This is an extremely useful option. You can set the exact time you want the profile to expire. For example, I like to switch from “Silent” to “General” when I get up. This is done by opening profiles as we did in the tip 26, clicking on the desired profile, and then pressing “Timed“. You will see the following screen, so set the preferred time and click “OK”. Note: after timed profile expires, phone will return to the previously active profile.
30. Change a theme. As you already know, Symbian is absolutely great for customization, so you can change the entire look and feel of the phone. I like elegant, black themes with simple icons, as the one you see in the screenshots above. These themes are easy to use, and they also save battery life, when compared to white (bright) themes! Go to “Settings”, and then “Themes“, and you’ll be at the following screen.
Select “General“, and choose the theme you like. Here’s a different theme, for your reference. You can download more themes from OVI Store.
31. Change a screensaver. To be honest, I don’t use screen savers, but the one on the N8 might change that. Go to “Settings -> Themes -> Screen saver“, and you’ll see a list of installed screen savers.
Try all of them to find the one you prefer. My friendly advice is to select the one named “Big Clock“. It’s very simple and elegant, and it gives you the info you need… Note: depending on your time settings, this clock can be digital or analogue.
32. Change time and date related settings. Relative to your culture and geographical location, you will want to change the time and date format. Simply navigate to “Settings -> Phone -> Time and Date“.
Click on it, and you’ll have a wide variety of options.
Make sure that the correct time and time zone are set (this will change when you travel to a different time zone), as well time and date formats. My advice is to change the clock type to “Digital“, because it takes less time to acknowledge the precise time (Get it? Never mind…
). You can also set your the default snooze time, if you want to sleep longer in the morning.
33. Manage motion sensor settings. N8 has a motion sensor for display rotation, and for some other cool options. We’re still at “Settings -> Phone”. Go to “Sensor settings“, make sure that “Sensors” field displays “On”, click on the “Turning control“, and you’ll see this screen:
First option is very handy, for example: you’re in a meeting, and you’ve forgotten to put your cell into the Meeting profile. The phone rings, and instead of rejecting the call, you can simply flip the phone screen-down, and it will stop producing sound. I like to have all 3 fields marked, but if you, for some reason, don’t want to have screen rotation, uncheck that.
34. Set a phone lock code. This options is very useful (use it carefully – make sure you don’t forget this code!!!) in case you want to protect your N8. Go to “Settings -> Phone -> Phone management”, then to “Security settings“, and then to “Phone and SIM card“. Find the “Lock code” field, and type in a numerical password (and verify it).
You can lock your phone, by pressing the Power button, and then “Lock phone”.
If you now try to unlock the N8, you will see the lock screen, followed by the screen that requires you to enter the lock code.
35. Remotely lock your phone! One of the best additions to the new Symbian is the ability to lock a lost phone by a single SMS! In case you lose your precious phone, this option is a phone-saver! You need to enable this, by going to ”Settings -> Phone -> Phone management”, then to “Security settings“, and then to “Phone and SIM card“. Now, locate the “Remote phone locking” field, and enable it.
You will be prompted to enter the remote locking message (the password). Now you can lock your phone, even if you’re not near the device, by sending an SMS (from any other phone) that contains the remote locking message. 36. Manage the menu button blinking. Another handy tip – the N8′s menu key can blink for selected amount of time if there’s an event (missed call and/or new message). To change the duration of the blinking and the events notified, go to ”Settings -> Phone -> Notification lights” and select “Notification light“.
Try all of them to find the one you prefer. My friendly advice is to select the one named “Big Clock“. It’s very simple and elegant, and it gives you the info you need… Note: depending on your time settings, this clock can be digital or analogue.
32. Change time and date related settings. Relative to your culture and geographical location, you will want to change the time and date format. Simply navigate to “Settings -> Phone -> Time and Date“.
Click on it, and you’ll have a wide variety of options.
Make sure that the correct time and time zone are set (this will change when you travel to a different time zone), as well time and date formats. My advice is to change the clock type to “Digital“, because it takes less time to acknowledge the precise time (Get it? Never mind…
33. Manage motion sensor settings. N8 has a motion sensor for display rotation, and for some other cool options. We’re still at “Settings -> Phone”. Go to “Sensor settings“, make sure that “Sensors” field displays “On”, click on the “Turning control“, and you’ll see this screen:
First option is very handy, for example: you’re in a meeting, and you’ve forgotten to put your cell into the Meeting profile. The phone rings, and instead of rejecting the call, you can simply flip the phone screen-down, and it will stop producing sound. I like to have all 3 fields marked, but if you, for some reason, don’t want to have screen rotation, uncheck that.
34. Set a phone lock code. This options is very useful (use it carefully – make sure you don’t forget this code!!!) in case you want to protect your N8. Go to “Settings -> Phone -> Phone management”, then to “Security settings“, and then to “Phone and SIM card“. Find the “Lock code” field, and type in a numerical password (and verify it).
You can lock your phone, by pressing the Power button, and then “Lock phone”.
If you now try to unlock the N8, you will see the lock screen, followed by the screen that requires you to enter the lock code.
35. Remotely lock your phone! One of the best additions to the new Symbian is the ability to lock a lost phone by a single SMS! In case you lose your precious phone, this option is a phone-saver! You need to enable this, by going to ”Settings -> Phone -> Phone management”, then to “Security settings“, and then to “Phone and SIM card“. Now, locate the “Remote phone locking” field, and enable it.
You will be prompted to enter the remote locking message (the password). Now you can lock your phone, even if you’re not near the device, by sending an SMS (from any other phone) that contains the remote locking message. 36. Manage the menu button blinking. Another handy tip – the N8′s menu key can blink for selected amount of time if there’s an event (missed call and/or new message). To change the duration of the blinking and the events notified, go to ”Settings -> Phone -> Notification lights” and select “Notification light“.
Now, select how long you want this button to blink, and the events that trigger this blinking. I think 30 minutes is just fine, and that both the missed call and new message should be notified.
Great, we’ve finished with the “Phone” section of the Settings.
37. Uninstall an app or theme. If you’ve installed an application that you do not fancy any more, you can uninstall it by going to the Application Manager (open Settings -> Application Manager). You will be at the following screen, so tap the “Installed apps” field:
The list of all installed applications will be shown, so you need to locate the unwanted application/theme, tap and hold that app, and click the “Uninstall” button in the pop-up window. Now click “Yes”, and the app is no more!
Your N8 is a multimedia beast, but it is a phone, after all. We’re now going to change some settings regarding the phone calls.
38. Activate call waiting. This option is superb for conference calls, so make sure you enable it. You’ll be able to talk to several persons at once, if you go to “Settings -> Calling -> Call”, and click on the “Call waiting” field.
Just tap “Activate“, and you’re good to go!
39. See call duration during the call. If you want to track the duration of your calls while talking, this option will come practical. Go to “Settings -> Calling -> Call”, and enable “Show call duration” field.
40. Display call summary when the call is over. I like this feature, because it shows the duration of the call as soon as you hang up. Go to “Settings -> Calling -> Call”, and enable “Summary after call” field.
Now, off to connectivity!
41. Change the type of USB connection. When you connect your N8 to the PC, it will automatically use “Nokia OVI Suite” mode. This mode comes handy for synchronization, but sometimes you just want to transfer files to/from PC. In order to change this mode, go to “Settings -> Connectivity” and select “USB“. You will see 4 available USB modes:

You can change the default type of connection simply by clicking on it, and you can also change the type while you’re connected!
42. Save data connection costs. If you have a limited dataplan you can save some KB’s by setting the phone to automatically switch from GPRS/3G to WiFi connection, when available. Go to ”Settings -> Connectivity”, and then choose “Settings“. In the first field select “Known WLANs only“, as pictured.

43. Change the priority of the Internet access points. When there are several WiFi networks available, the best way to choose the one you want is to prioritize. Visit ”Settings -> Connectivity -> Settings”, and click “Destinations“.

Select “Internet“, and you will see a list of saved APs. Tap and hold the access point you want to move up/down, and you’ll see the following screen:

Simply tap “Change priority“, and then tap on the position you want to place that AP.
44. Create a new access point manually. There will be situations when you need to fill in some advanced data for certain WLAN networks (hidden and proxy-based networks come to my mind). In order to achieve this, go to ”Settings -> Connectivity -> Settings -> Destinations”, and click on the “Access Point” field. You will be asked if you would like to search for available WiFi hotspots. This won’t work for hidden networks, so click “No” in that case. Otherwise, click “Yes” and select desired WiFi network. If you choose to manually add all data, you will need to choose the type of new access point (WLAN or Packet data). After that, just follow the creation process, and fill in the data needed.
45. Manage active connections. If you want to have full control of active data or WiFi connections, go to “Settings -> Connectivity” and then open “Connection manager“. If there are zero active connections, you’ll see a “no active connections” message, and if you’re, for example, connected to WiFi, you’ll see the name of access point that connects your Symbian^3 phone to network, as well the duration of that connection:

If you tap on that AP, you will be given detailed info about that network connection. If you tap and hold AP, you will be able to disconnect that AP. Very useful in some cases!
You can change the default type of connection simply by clicking on it, and you can also change the type while you’re connected!
42. Save data connection costs. If you have a limited dataplan you can save some KB’s by setting the phone to automatically switch from GPRS/3G to WiFi connection, when available. Go to ”Settings -> Connectivity”, and then choose “Settings“. In the first field select “Known WLANs only“, as pictured.
43. Change the priority of the Internet access points. When there are several WiFi networks available, the best way to choose the one you want is to prioritize. Visit ”Settings -> Connectivity -> Settings”, and click “Destinations“.
Select “Internet“, and you will see a list of saved APs. Tap and hold the access point you want to move up/down, and you’ll see the following screen:
Simply tap “Change priority“, and then tap on the position you want to place that AP.
44. Create a new access point manually. There will be situations when you need to fill in some advanced data for certain WLAN networks (hidden and proxy-based networks come to my mind). In order to achieve this, go to ”Settings -> Connectivity -> Settings -> Destinations”, and click on the “Access Point” field. You will be asked if you would like to search for available WiFi hotspots. This won’t work for hidden networks, so click “No” in that case. Otherwise, click “Yes” and select desired WiFi network. If you choose to manually add all data, you will need to choose the type of new access point (WLAN or Packet data). After that, just follow the creation process, and fill in the data needed.
45. Manage active connections. If you want to have full control of active data or WiFi connections, go to “Settings -> Connectivity” and then open “Connection manager“. If there are zero active connections, you’ll see a “no active connections” message, and if you’re, for example, connected to WiFi, you’ll see the name of access point that connects your Symbian^3 phone to network, as well the duration of that connection:
If you tap on that AP, you will be given detailed info about that network connection. If you tap and hold AP, you will be able to disconnect that AP. Very useful in some cases!
46. Hide unwanted WiFi networks. I was really pleased when I saw this option. It allows you to skip unwelcome WLAN hotspots during your WiFi scanning process – very convenient in places with many WLANs! As in several previous tips, go to “Settings -> Connectivity”, but now tap “WLAN“. When you do that, you will see a list of all available WiFi networks in your surroundings. In order to display only the one(s) you use/like, do the following: click “Options”, and then “Filter WLANs”.

Now, mark the ones you want to put out of sight, and click “OK”. (I had to blur the first WLAN, it’s name was obscene)… That’s it, you will only see the WLANs you want in the future searches.

47. Scan Bluetooth device by type. This feature is also new, and I find it quite nifty! When pairing with a new Bluetooth device, you need to scan nearby devices. In order to be more productive, the N8 can search devices by their type (audio devices, phones, PCs and input devices). Simply visit “Settings -> Connectivity -> Bluetooth“, and select the second tab, “Paired devices“.

Now just tap “Options”, and then “New paired device“. You will be given a choice:

Choose the category you need, and pair your device!
48. Transfer important data from your old phone. You’ve bought the shiny new N8, but you need all your contacts, bookmarks and calendar entries from your previous Nokia. No need to worry, this is super-simple, just follow my lead. Open “Settings -> Connectivity”, and then “Data transfer“. Select “Phone switch” and then read one of my previous tutorials: How to transfer contacts to your new Nokia? .
49. Use USB-on-the-go! This is one of my favorite Symbian^3 features, because it allows me to transfer files from USB stick to my mobile phone (and vice versa) without the use of PC! The N8 comes with the micro USB to USB cable that you use for this type of connection (unfortunately, C7 doesn’t) . Simply plug the USB memory (or even external hard disk!) to the cable, and then plug the other end of the cable to micro USB port on the phone. File Manager will be launched automatically, and you will see your flash memory in the list:

If you tap and hold the name of your USB device, you’ll have some quite handy options available. Among others, you will be able to format the drive and to rename it.

If you just click on your USB in the list, you will see a list of files and folders that are currently on it. Tap and hold any file to copy it to phone’s memory, to rename it or delete it. It’s the same for other direction (if you want to copy something from the phone to the USB) – locate the desired file/folder using File Manager, tap and hold it, and after pressing “Copy to folder“, select the destination.

50. Always safely remove USB sticks. This is not a must, but it is advisable. In order to prevent data loss, do the following: tap on the up-right corner if in the home screen (or in the Menu, holding the phone vertically), or the bottom-center key, if in Menu, holding the phone horizontally. You will see a pop-up, and just press “Remove USB device“.
Now, mark the ones you want to put out of sight, and click “OK”. (I had to blur the first WLAN, it’s name was obscene)… That’s it, you will only see the WLANs you want in the future searches.
47. Scan Bluetooth device by type. This feature is also new, and I find it quite nifty! When pairing with a new Bluetooth device, you need to scan nearby devices. In order to be more productive, the N8 can search devices by their type (audio devices, phones, PCs and input devices). Simply visit “Settings -> Connectivity -> Bluetooth“, and select the second tab, “Paired devices“.
Now just tap “Options”, and then “New paired device“. You will be given a choice:
Choose the category you need, and pair your device!
48. Transfer important data from your old phone. You’ve bought the shiny new N8, but you need all your contacts, bookmarks and calendar entries from your previous Nokia. No need to worry, this is super-simple, just follow my lead. Open “Settings -> Connectivity”, and then “Data transfer“. Select “Phone switch” and then read one of my previous tutorials: How to transfer contacts to your new Nokia? .
49. Use USB-on-the-go! This is one of my favorite Symbian^3 features, because it allows me to transfer files from USB stick to my mobile phone (and vice versa) without the use of PC! The N8 comes with the micro USB to USB cable that you use for this type of connection (unfortunately, C7 doesn’t) . Simply plug the USB memory (or even external hard disk!) to the cable, and then plug the other end of the cable to micro USB port on the phone. File Manager will be launched automatically, and you will see your flash memory in the list:
If you tap and hold the name of your USB device, you’ll have some quite handy options available. Among others, you will be able to format the drive and to rename it.
If you just click on your USB in the list, you will see a list of files and folders that are currently on it. Tap and hold any file to copy it to phone’s memory, to rename it or delete it. It’s the same for other direction (if you want to copy something from the phone to the USB) – locate the desired file/folder using File Manager, tap and hold it, and after pressing “Copy to folder“, select the destination.
50. Always safely remove USB sticks. This is not a must, but it is advisable. In order to prevent data loss, do the following: tap on the up-right corner if in the home screen (or in the Menu, holding the phone vertically), or the bottom-center key, if in Menu, holding the phone horizontally. You will see a pop-up, and just press “Remove USB device“.
51. Connect USB mouse to the phone. This feature is great, not only for showing off, but for productivity, too!
Simply, plug in the mouse via mentioned USB cable, and you’re good to go. The mouse pointer (arrow) will be shown on the phone’s display. Check out the pic below. Cool, right?
Instead of touching the screen, press the left mouse button, and the tap will be simulated! Press the right key to minimize an app, or to open the menu. Press and hold the right key to open task manager. You can even use the scroll wheel to navigate through gallery with more speed! Truly, an amazing feature!
Great, we’ve finished Connectivity. This pretty much covers the settings you will need, so now, short tricks.
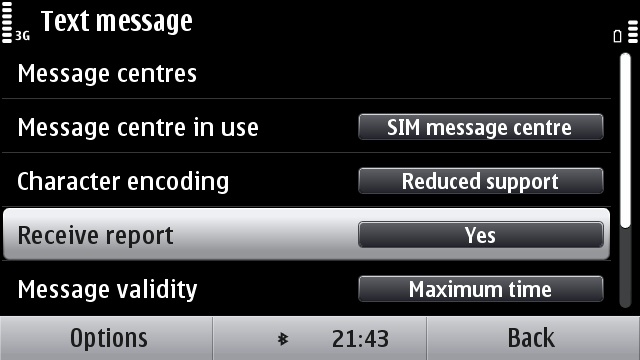
52. Receive reports for sent text messages. This fundamental option is disabled by default, and I really don’t know why. To correct this mistake, go to “Messaging”, and then Options -> Settings -> Text message”. Find the field called “Receive report“, and select “Yes”.
53. Find the Log icon. At first, I almost though Symbian^3 ditched the log of all your communication data. Yes, it was THAT hard to find. The Log is well hidden in “Applications -> Tools” – not that deep down in the menu, but it was the last place I looked. That’s why I moved it to the main (Root) folder of the Menu.
54. Send a SMS from the call log. This is another handy time saver. For example, imagine you have one missed call, and you want to send a text to the person who tried to reach you. Instead of opening the Messaging app, just tap and hold that entry in the call log (this also works for dialed and received calls), and you’ll see a pop up window, that will allow you to quickly send the message (among other things). Click “Create message“, and start typing! Hat tip to Darko for this one!
55. Send or share multiple photos at once. This is truly a time saver, so pay attention. Tap the Photos icon, and choose, for example, “All”. Now, click on the tick (check mark) icon, and you’ll be in the mode for multiple selection. Check the pics you want to send, then click “Options -> Send” and select the desired method.
56. Download applications from OVI Store. Your N8 comes with preinstalled OVI Store client, so getting new apps is effortless. The number of Symbian^3 apps is still not massive, but we won’t have to wait too long for more great content.
Instead of touching the screen, press the left mouse button, and the tap will be simulated! Press the right key to minimize an app, or to open the menu. Press and hold the right key to open task manager. You can even use the scroll wheel to navigate through gallery with more speed! Truly, an amazing feature!
Great, we’ve finished Connectivity. This pretty much covers the settings you will need, so now, short tricks.
52. Receive reports for sent text messages. This fundamental option is disabled by default, and I really don’t know why. To correct this mistake, go to “Messaging”, and then Options -> Settings -> Text message”. Find the field called “Receive report“, and select “Yes”.
53. Find the Log icon. At first, I almost though Symbian^3 ditched the log of all your communication data. Yes, it was THAT hard to find. The Log is well hidden in “Applications -> Tools” – not that deep down in the menu, but it was the last place I looked. That’s why I moved it to the main (Root) folder of the Menu.
54. Send a SMS from the call log. This is another handy time saver. For example, imagine you have one missed call, and you want to send a text to the person who tried to reach you. Instead of opening the Messaging app, just tap and hold that entry in the call log (this also works for dialed and received calls), and you’ll see a pop up window, that will allow you to quickly send the message (among other things). Click “Create message“, and start typing! Hat tip to Darko for this one!
55. Send or share multiple photos at once. This is truly a time saver, so pay attention. Tap the Photos icon, and choose, for example, “All”. Now, click on the tick (check mark) icon, and you’ll be in the mode for multiple selection. Check the pics you want to send, then click “Options -> Send” and select the desired method.
57. Use WiFi when possible. WiFi connection has several advantages over data connection: it’s free, it’s (usually) faster and it consumes less battery, so you should have this tip on mind all the time.
58. Add bookmarks to the browser. This may seem as a nuisance at first, but you need to think ahead, because it will make your browsing easier. When you land on a certain (frequently used) page, adding a bookmark can’t be easier. Click on the bidirectional arrow in the right-bottom of the screen to show the hidden buttons, and then click on the 3 horizontal stripes (more options). You will see a pop-up window with several icons.
Tap “Save bookmark” icon, name the bookmark, and it’s done!
59. Download additional language(s) for the dictionary. When you launch the inbuilt “Dictionary” app (located in Applications -> Office), you will be prompted to download another language (English is preinstalled). Do that, and you’ll have a decent, offline, bilingual translations! Works very well with Serbian-English translations.
60. Set the audio recording quality to high. The N8 has a fine preinstalled audio recording software called Recorder (located in Applications -> Office). You can run the app during the phone call and record it, and in order to get the best quality of sound, you need to take the following action. Launch the Recorder, tap “Options -> Settings”, and select “High“, in the “recording quality” field.
61. Set up an email account. Creating a new mailbox couldn’t be more convenient. Just launch the app called Mail (located in the Applications folder), and tap on the “New” icon. If you’re using one of the popular email providers (Yahoo!, Google, Hotmail, OVI), all you need to fill in is your email address, and the corresponding password. Everything else takes place automatically!
62. Update phone software regularly. Nokia will publish various firmware updates for your phone, so make sure you always have the newest version. Because all Symbian^3 phones support OTA (Over The Air) updates, you can easily update software without the PC. Just type in *#0000# (these are zeros), and you’ll see firmware details.

Tap “Options -> Check for updates“, and see if there’s an update from Nokia!
63. Launch the camera by pressing the Camera button!
64. Set the camera resolution to maximum. In order to have full screen images, the default resolution on my N8 was set to 9MP. If you want to have the best quality, launch the camera, and tap “Options – > Settings“. Change the the first field (Image quality) to the greatest value.
65. Enable video stabilisation. The N8 can record great 720p video, and this tip will make your video creation a little less shaky. Open the camera, switch to video mode by pressing the camcorder icon, and then tap ”Options – > Settings”. Find the field called “Video stabilisation” and click on it to display “On”. Please don’t go through the menu and search for the camera icon, this is WAY faster.
66. Activate the “power saving mode”. When the battery is down to one (or two) bar(s), it’s very smart to activate this mode – it will dim the display, disconnect Bluetooth, disable the screensaver and switch to GSM from 3G network (that means: no fast data traffic and no video calls)…, and by doing so, you’ll will significantly prolong the operating time of the phone. Just press the power button, and scroll down till you see “Activate power saving“. Click on it, and the economic mode is on. I also switch to power saving mode at night, and that way, I get more from my battery!
67. Remove memory card without turning the phone off. You can hot-swap memory cards quite easily. As in the previous tip, push the Power button, and then tap “Remove F: memory“. This will close all running apps that are installed on this memory, and you will be able to safely remove the memory card. Note: This tip doesn’t include the C7 because, unfortunately, it’s microSD slot is located under the battery.
Applications
- Calendar: browse through days by swiping through screen from left to right or vice versa to browse back
- Camera: use Pinch zoom to switch between 4:3 and 16:9 aspect ratios (9Mpix vs 12Mpix on N8)
- Camera: double press on screen to zoom (like with browser)
- Camera: you can also zoom by using volume keys
- Clock: switch between analog and digital clock by tapping the big clock shown on screen
- File Manager: connect to a network drive by choosing the setting from options menu (instead of Settings)
- File Manager: jump down on folder tree by pressing on one of the folder icons on top of the screen
- File Manager: open search bar by lightly pressing on camera key
- Gallery: Three ways to zoom pictures; by making a double press, a pinch zoom or by using volume keys
- Mail: Collapse and expand all days by doing longpress on a day
- Menu (App. Grid): instead of leaving it to background, choose Options > Exit
- Profiles: set profile (except general and offline) to change based on time of the day from profile settings
- Ovi Maps: share current (or favorite) location via MMS or E-Mail to any other Nokia device with Maps
- Task Manager: open Task Manager by doing longpress on (physical) menukey on the phone
- Task Manager: longpress on any of the apps to bring out option to close invidual or all running apps
- Lost Application (general): in case you accidently delete some of Nokia applications, like Communities or Midnight theme pack, use Software Update re-install it
62. Update phone software regularly. Nokia will publish various firmware updates for your phone, so make sure you always have the newest version. Because all Symbian^3 phones support OTA (Over The Air) updates, you can easily update software without the PC. Just type in *#0000# (these are zeros), and you’ll see firmware details.
Tap “Options -> Check for updates“, and see if there’s an update from Nokia!
63. Launch the camera by pressing the Camera button!
64. Set the camera resolution to maximum. In order to have full screen images, the default resolution on my N8 was set to 9MP. If you want to have the best quality, launch the camera, and tap “Options – > Settings“. Change the the first field (Image quality) to the greatest value.
65. Enable video stabilisation. The N8 can record great 720p video, and this tip will make your video creation a little less shaky. Open the camera, switch to video mode by pressing the camcorder icon, and then tap ”Options – > Settings”. Find the field called “Video stabilisation” and click on it to display “On”. Please don’t go through the menu and search for the camera icon, this is WAY faster.
66. Activate the “power saving mode”. When the battery is down to one (or two) bar(s), it’s very smart to activate this mode – it will dim the display, disconnect Bluetooth, disable the screensaver and switch to GSM from 3G network (that means: no fast data traffic and no video calls)…, and by doing so, you’ll will significantly prolong the operating time of the phone. Just press the power button, and scroll down till you see “Activate power saving“. Click on it, and the economic mode is on. I also switch to power saving mode at night, and that way, I get more from my battery!
67. Remove memory card without turning the phone off. You can hot-swap memory cards quite easily. As in the previous tip, push the Power button, and then tap “Remove F: memory“. This will close all running apps that are installed on this memory, and you will be able to safely remove the memory card. Note: This tip doesn’t include the C7 because, unfortunately, it’s microSD slot is located under the battery.
Congratulations, if you’ve made it this far!!!
Here’s few handy shortcuts as well.Applications
- Calendar: browse through days by swiping through screen from left to right or vice versa to browse back
- Camera: use Pinch zoom to switch between 4:3 and 16:9 aspect ratios (9Mpix vs 12Mpix on N8)
- Camera: double press on screen to zoom (like with browser)
- Camera: you can also zoom by using volume keys
- Clock: switch between analog and digital clock by tapping the big clock shown on screen
- File Manager: connect to a network drive by choosing the setting from options menu (instead of Settings)
- File Manager: jump down on folder tree by pressing on one of the folder icons on top of the screen
- File Manager: open search bar by lightly pressing on camera key
- Gallery: Three ways to zoom pictures; by making a double press, a pinch zoom or by using volume keys
- Mail: Collapse and expand all days by doing longpress on a day
- Menu (App. Grid): instead of leaving it to background, choose Options > Exit
- Profiles: set profile (except general and offline) to change based on time of the day from profile settings
- Ovi Maps: share current (or favorite) location via MMS or E-Mail to any other Nokia device with Maps
- Task Manager: open Task Manager by doing longpress on (physical) menukey on the phone
- Task Manager: longpress on any of the apps to bring out option to close invidual or all running apps
- Lost Application (general): in case you accidently delete some of Nokia applications, like Communities or Midnight theme pack, use Software Update re-install it
Subscribe to:
Posts (Atom)